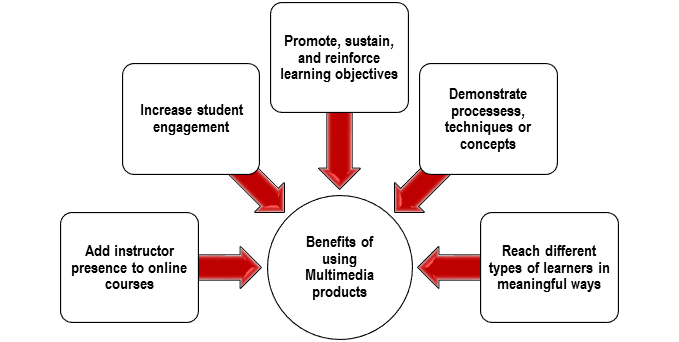
The use of multimedia products in education have increased tremendously. Multimedia refers to the use of technology to integrate text, graphics, drawings, video, animation, audio and any other media file that is used to represent, store, transmit or process information digitally. There are many benefits of using multimedia tools including:
- Adding an instructor presence to online courses
- Increase student engagement
- Promote, sustain and reinforce learning objectives
- Demonstrate processes, techniques or concepts,
- Reach different types of learners in meaningful ways
For today’s tech snack, I will be discussing a web 2.0 tool that allows for multimedia integration and use.
Today’s tech snack can be found at the following url: https://www.genial.ly/
What is it?
Genial.ly is a web based tool that allows you to create interactive posters and presentations. The tool is web based and uses html 5 technology which means that posters and presentations made with this tool can be viewed/accessed on any Internet enabled device.
**Note, at the current time, creating the posters and presentations requires a laptop or desktop. They are working on an app version, which is still not ready. It does work on some tablets but not all. I tried to use it on my Samsung tablet with it to create content and was directed to the mobile page stating they are working on an app version. On my ipad, however, I was able to login into the site and build posters.**
How does it work?
As with many Web 2.0 tools, genial.ly has free and paid services. To create a free account, you must input an active email address and create a password. Once you have created your free account, you can start creating your interactive posters and presentation. You can do so by building a poster from scratch or by using one of the templates available. They have a number of different templates available.
The web tool uses a click and drag interface, where you add elements to your poster. You can add pictures, text, videos and interactive components. The interactive components allow you to add website links, and embedded content.
Everything you create is saved ultimately on the cloud and all your genial.ly creations can be shared via url, email or embed code. All genial.ly creations you share can be accessed and viewed on any Internet enabled device including tablets and cell phones. No username and password required to view content.
Tech knowledge needed
The interface for genial.ly is click and drag. Using genial.ly is easy to learn, though if you are a tech novice you may want to play around with the items to get to know how to navigate and add content. English video tutorials with captions are available on youtube for further review about how to navigate the interface.
Accessibility of product
Genial.ly is not an American product. In fact, it is based in Europe and as such does not fall under the same rules for accessibility. They do not have to comply with the Americans Disability Act and their accessibility standards are different. In fact, the European Union recently voted to have minimum accessibility standards for all websites. Older websites will have 2 years to comply with the regulations and mobile apps will have 33 months.
So, because genial.ly is an international product, they do not have a VPAT(Voluntary Product Accessibility Template) available. Their product is purely click and drag, which means that it will work with a computer mouse for laptops/desktops and fingers and/or stylus for tablets. Genial.ly does not work with joysticks or keyboard commands. So people with dexterity issues may have a difficult time navigating and creating content on genial.ly. Also, there is no way to add alternative text for visually impaired people who relay on screen readers to tell them what an image is. So in terms of accessibility, this product gets a C.
Classroom implications
The fact that it can be used on any Internet enabled device and offers a variety of creation projects (posters, infographics, presentations, etc) also serves a powerful advantage over other products. Using this tool, you could create a classroom presentation and you can share the presentation either using a LCD projector or simply sharing the URL with your students. This tool can also be used by your students for class projects. See below for some other creative ways that this tool can be used:
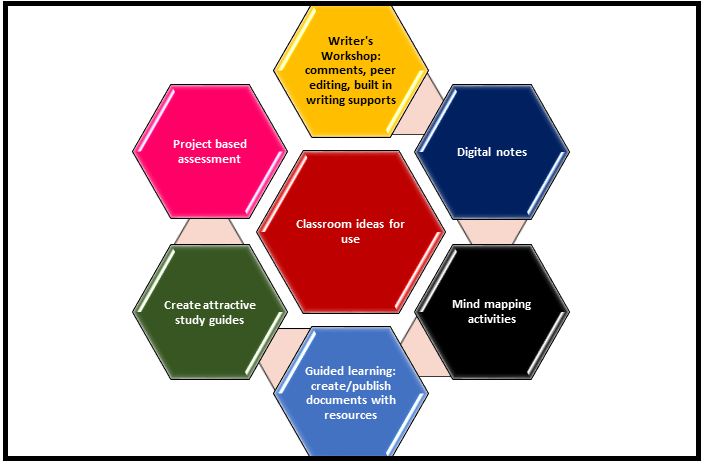
Classroom ideas for use
So a great tool that has potential, but be aware of the accessibility limitations before use. Until next time at the café......


 RSS Feed